透 1 Getting Started Objectives In this chapter,you: Learn how to use Meet MINITAB,page 1-1 Start MINTTAB,page 1-3 Open and examine a worksheet,page 1-4 Overview Meet MINTTAB introduces you to the most commonly used features in MINTTAB. Throughout the book,you use functions,create graphs,and generate statistics.The contents of Meet MINITAB relate to the actions you need to perform in your own MINITAB sessions.You use a sampling of MINTTAB's features to see the range of features and statistics that MINTTAB provides. Most statistical analyses require a series of steps,often directed by background knowledge or by the subject area you are investigating.Chapters 2 through 5 illustrate the analysis steps in a typical MINITAB session: Exploring data with graphs Conducting statistical analyses and procedures ■Assessing quality Designing an experiment Chapters 6 through 9 provide information on: Using shortcuts to automate future analyses ■Generating a report Preparing worksheets Customizing MINTTAB to fit your needs Meet MINITAB 1-1
Meet MINITAB 1-1 1 Getting Started Objectives In this chapter, you: ■ Learn how to use Meet MINITAB, page 1-1 ■ Start MINITAB, page 1-3 ■ Open and examine a worksheet, page 1-4 Overview Meet MINITAB introduces you to the most commonly used features in MINITAB. Throughout the book, you use functions, create graphs, and generate statistics. The contents of Meet MINITAB relate to the actions you need to perform in your own MINITAB sessions. You use a sampling of MINITAB’s features to see the range of features and statistics that MINITAB provides. Most statistical analyses require a series of steps, often directed by background knowledge or by the subject area you are investigating. Chapters 2 through 5 illustrate the analysis steps in a typical MINITAB session: ■ Exploring data with graphs ■ Conducting statistical analyses and procedures ■ Assessing quality ■ Designing an experiment Chapters 6 through 9 provide information on: ■ Using shortcuts to automate future analyses ■ Generating a report ■ Preparing worksheets ■ Customizing MINITAB to fit your needs
Chapter 1 Typographical Conventions in this Book Chapter 10,Getting Help,includes information on getting answers and using MINTTAB Help features.Chapter 11,Reference,provides an overview of the MINITAB environment,a discussion about the types and forms of data that MINITAB uses,and quick-reference tables of actions and statistics available in MINTTAB. You can work through Meet MINITAB in two ways: From beginning to end,following the story of a fictional online book store through a common workflow By selecting a specific chapter to familiarize yourself with a particular area of MINITAB Meet MINITAB introduces dialog boxes and windows when you need them to perform a step in the analysis.As you work,look for these icons for additional information: Provides notes and tips 嗣 Suggests related topics in MINITAB Help and StatGuide Typographical Conventions in this Book Enter Denotes a key,such as the Enter key. Alt+D Denotes holding down the first key and pressing the second key. For example,while holding down the Alt key,press the D key. File Exit Denotes a menu command,in this case choose Exit from the File menu.Here is another example:Stat Tables Tally Individual Variables means open the Stat menu,then open the Tables submenu,and finally choose Tally Individual Variables. Click OK. Bold text clarifies dialog box items and buttons and MINTTAB commands. Enter Pulsel. Italic text specifies text you need to enter. 1-2 Meet MINITAB
Chapter 1 Typographical Conventions in this Book 1-2 Meet MINITAB Chapter 10, Getting Help, includes information on getting answers and using MINITAB Help features. Chapter 11, Reference, provides an overview of the MINITAB environment, a discussion about the types and forms of data that MINITAB uses, and quick-reference tables of actions and statistics available in MINITAB. You can work through Meet MINITAB in two ways: ■ From beginning to end, following the story of a fictional online book store through a common workflow ■ By selecting a specific chapter to familiarize yourself with a particular area of MINITAB Meet MINITAB introduces dialog boxes and windows when you need them to perform a step in the analysis. As you work, look for these icons for additional information: Provides notes and tips Suggests related topics in MINITAB Help and StatGuide Typographical Conventions in this Book e Denotes a key, such as the Enter key. a+D Denotes holding down the first key and pressing the second key. For example, while holding down the a key, press the D key. File ➤ Exit Denotes a menu command, in this case choose Exit from the File menu. Here is another example: Stat ➤ Tables ➤ Tally Individual Variables means open the Stat menu, then open the Tables submenu, and finally choose Tally Individual Variables. Click OK. Bold text clarifies dialog box items and buttons and MINITAB commands. Enter Pulse1. Italic text specifies text you need to enter
The Story Getting Started The Story An online book retail company has three regional shipping centers that distribute orders to consumers.Each shipping center uses a different computer system to enter and process order information.To integrate all orders and use the most efficient method company wide,the company wants to use the same computer system at all three shipping centers. Throughout this book,you analyze data from the shipping centers as you learn to use MINTTAB.You create graphs and conduct statistical analyses to determine which computer system is the most efficient and results in the shortest delivery time. After you identify the most efficient computer system,you focus on the data from this center.First,you create control charts to see whether the center's shipping process is in control.Then,you conduct a capability analysis to see whether the process is operating within specification limits.Finally,you conduct a designed experiment to further improve the shipping center's processes. Additionally,you learn about session commands,generating a report,preparing a worksheet,and customizing MINTTAB. Starting MINITAB Before you begin your analysis,start MINTTAB and examine the layout of the windows. Start MINITAB 1 From the Windows Taskbar,choose Start Programs MINITAB 14> MINITAB 14. MINITAB opens with two main windows visible: The Session window displays the results of your analysis in text format.Also,in this window,you can enter commands instead of using MINTTAB's menus. The Data window contains an open worksheet,which is similar in appearance to a spreadsheet.You can open multiple worksheets-each in a different Data window. Meet MINITAB 1-3
The Story Getting Started Meet MINITAB 1-3 The Story An online book retail company has three regional shipping centers that distribute orders to consumers. Each shipping center uses a different computer system to enter and process order information. To integrate all orders and use the most efficient method company wide, the company wants to use the same computer system at all three shipping centers. Throughout this book, you analyze data from the shipping centers as you learn to use MINITAB. You create graphs and conduct statistical analyses to determine which computer system is the most efficient and results in the shortest delivery time. After you identify the most efficient computer system, you focus on the data from this center. First, you create control charts to see whether the center’s shipping process is in control. Then, you conduct a capability analysis to see whether the process is operating within specification limits. Finally, you conduct a designed experiment to further improve the shipping center’s processes. Additionally, you learn about session commands, generating a report, preparing a worksheet, and customizing MINITAB. Starting MINITAB Before you begin your analysis, start MINITAB and examine the layout of the windows. Start MINITAB 1 From the Windows Taskbar, choose Start ➤ Programs ➤ MINITAB 14 ➤ MINITAB 14. MINITAB opens with two main windows visible: ■ The Session window displays the results of your analysis in text format. Also, in this window, you can enter commands instead of using MINITAB’s menus. ■ The Data window contains an open worksheet, which is similar in appearance to a spreadsheet. You can open multiple worksheets—each in a different Data window
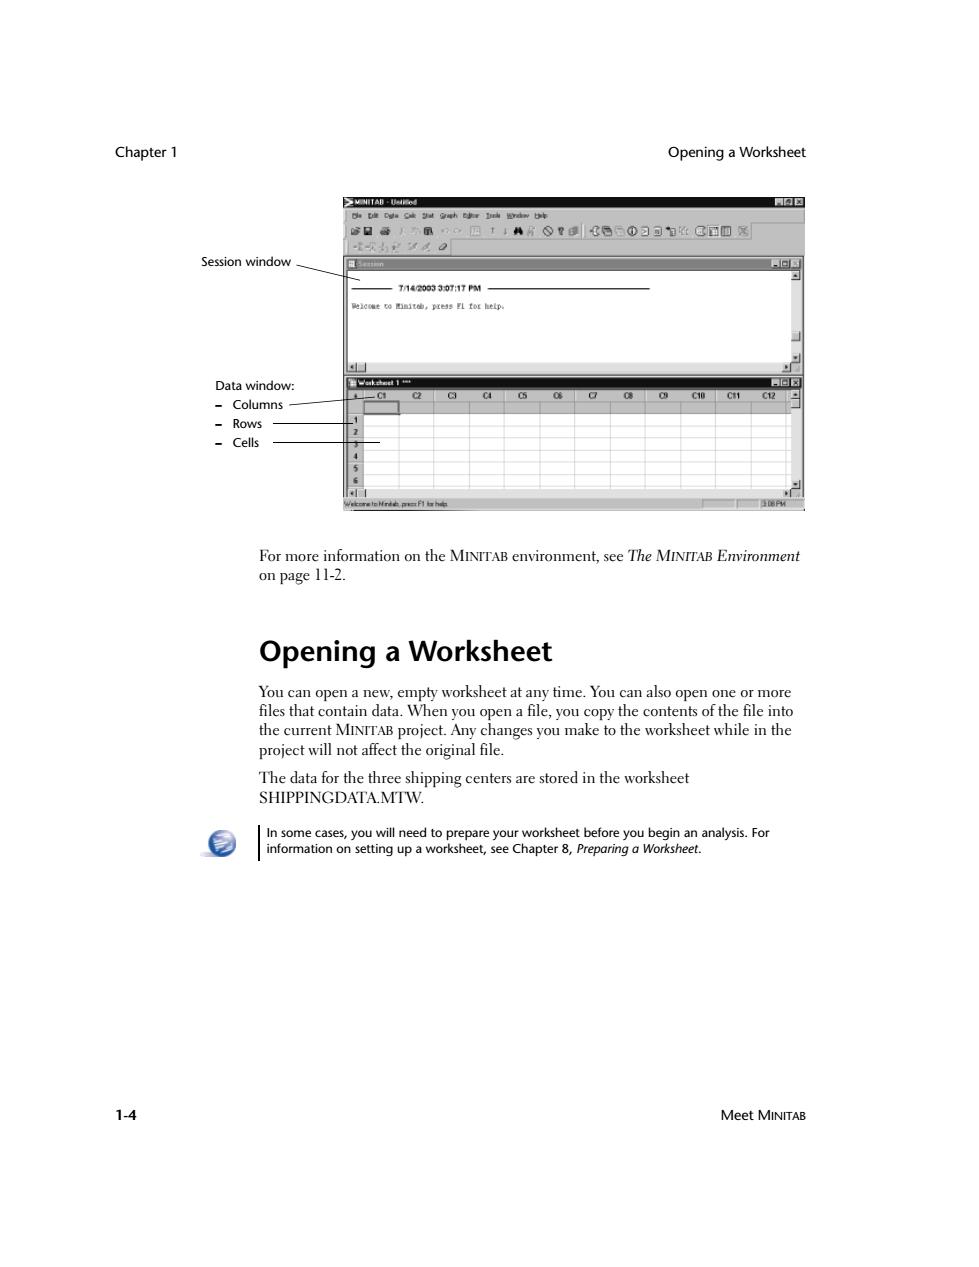
Chapter 1 Opening a Worksheet ≥TAd 网国 修日等人m。四114片⊙?a|《后①习可日经C面四飞 Session window 回 -T142003307:17PM eewt0it地,prs3 FL tor hetp Data window: 回☒ C12 -Columns Rows -Cells For more information on the MINITAB environment,see The MINITAB Environment on page 11-2. Opening a Worksheet You can open a new,empty worksheet at any time.You can also open one or more files that contain data.When you open a file,you copy the contents of the file into the current MINTTAB project.Any changes you make to the worksheet while in the project will not affect the original file. The data for the three shipping centers are stored in the worksheet SHIPPINGDATA MTW. In some cases,you will need to prepare your worksheet before you begin an analysis.For information on setting up a worksheet,see Chapter 8,Preparing a Worksheet. 1-4 Meet MINITAB
Chapter 1 Opening a Worksheet 1-4 Meet MINITAB For more information on the MINITAB environment, see The MINITAB Environment on page 11-2. Opening a Worksheet You can open a new, empty worksheet at any time. You can also open one or more files that contain data. When you open a file, you copy the contents of the file into the current MINITAB project. Any changes you make to the worksheet while in the project will not affect the original file. The data for the three shipping centers are stored in the worksheet SHIPPINGDATA.MTW. Data window: – Columns – Rows – Cells Session window In some cases, you will need to prepare your worksheet before you begin an analysis. For information on setting up a worksheet, see Chapter 8, Preparing a Worksheet
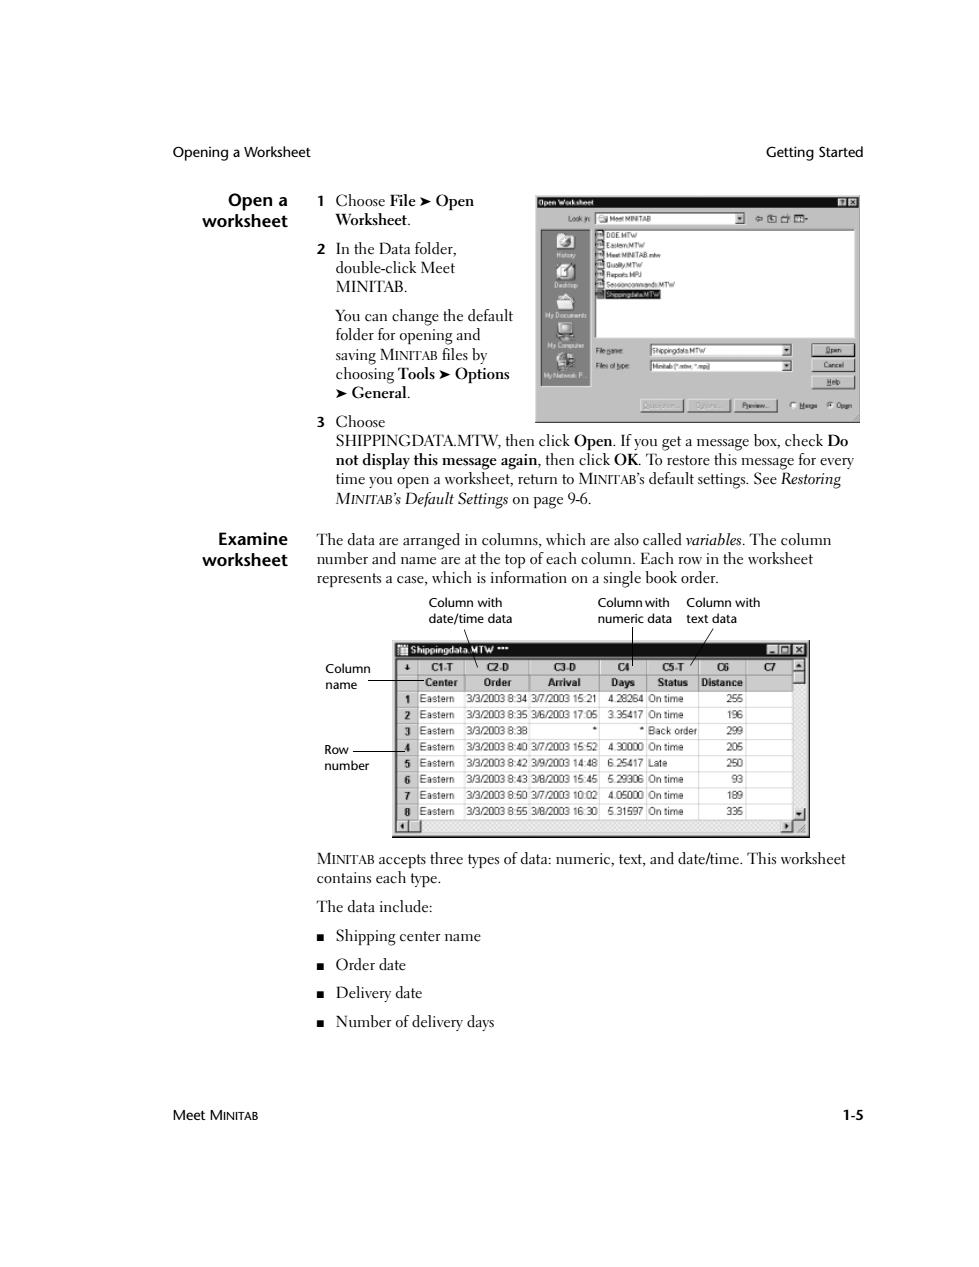
Opening a Worksheet Getting Started Open a 1 Choose File>Open 口☒ worksheet Worksheet. DOF HTW 2 In the Data folder. MpTB标 double-click Meet Sy MTW MINITAB. You can change the default folder for opening and saving MINITAB files by Carcsl choosing Tools >Options >General. 3 Choose SHIPPINGDATA.MTW,then click Open.If you get a message box,check Do not display this message again,then click OK.To restore this message for every time you open a worksheet,return to MINTTAB's default settings.See Restoring MINITAB's Default Settings on page 9-6. Examine The data are arranged in columns,which are also called variables.The column worksheet number and name are at the top of each column.Each row in the worksheet represents a case,which is information on a single book order. Column with Column with Column with date/time data numeric data text data 道Shippingdata.MTw" 何☒ Column C1.T C2.D C3D C C5.T 06 name -Center Order Arrival Days Status Distance 1 Eastern33200383437200015214282340 n time 255 2 Eastern 33200383536200917053354170 n time 196 Eastern 3320038.33 ·Back order 299 Row Eastern 3/3200384037200315524300000 n time 205 number 5 Eastern 3320038423920031448625417La1m 250 Eastern 33200384338200315455293060 n time 93 7 Eastern 33200385037200310024050000 n time 189 3320038553820016305315970 n time 336 MINTTAB accepts three types of data:numeric,text,and date/time.This worksheet contains each type. The data include: ■Shipping center name ■Order date ■Delivery date Number of delivery days Meet MINITAB 1-5
Opening a Worksheet Getting Started Meet MINITAB 1-5 Open a worksheet 1 Choose File ➤ Open Worksheet. 2 In the Data folder, double-click Meet MINITAB. You can change the default folder for opening and saving MINITAB files by choosing Tools ➤ Options ➤ General. 3 Choose SHIPPINGDATA.MTW, then click Open. If you get a message box, check Do not display this message again, then click OK. To restore this message for every time you open a worksheet, return to MINITAB’s default settings. See Restoring MINITAB’s Default Settings on page 9-6. Examine worksheet The data are arranged in columns, which are also called variables. The column number and name are at the top of each column. Each row in the worksheet represents a case, which is information on a single book order. MINITAB accepts three types of data: numeric, text, and date/time. This worksheet contains each type. The data include: ■ Shipping center name ■ Order date ■ Delivery date ■ Number of delivery days Column with date/time data Column name Column with numeric data Column with text data Row number