page 22 居 Figure 2-6:Advanced Mode-Accessing Acquisition Controls The user can modify any control,hit Next to acquire.or Back to retumn to the preview mode If Next is selected the following screens are displayed: Your image has been acquired Save wizard protocor? 8 ⊙ Figure 2-7:Image Acquisition Confirmation Prompts Selecting the Yes option and clicking Next will give a save protocol dialog box The protocol will be added to the list of existing protocols. Selecting the No option and clicking Next will generate the save image dialog box: FluorChem HD2 and FC2 User Guide
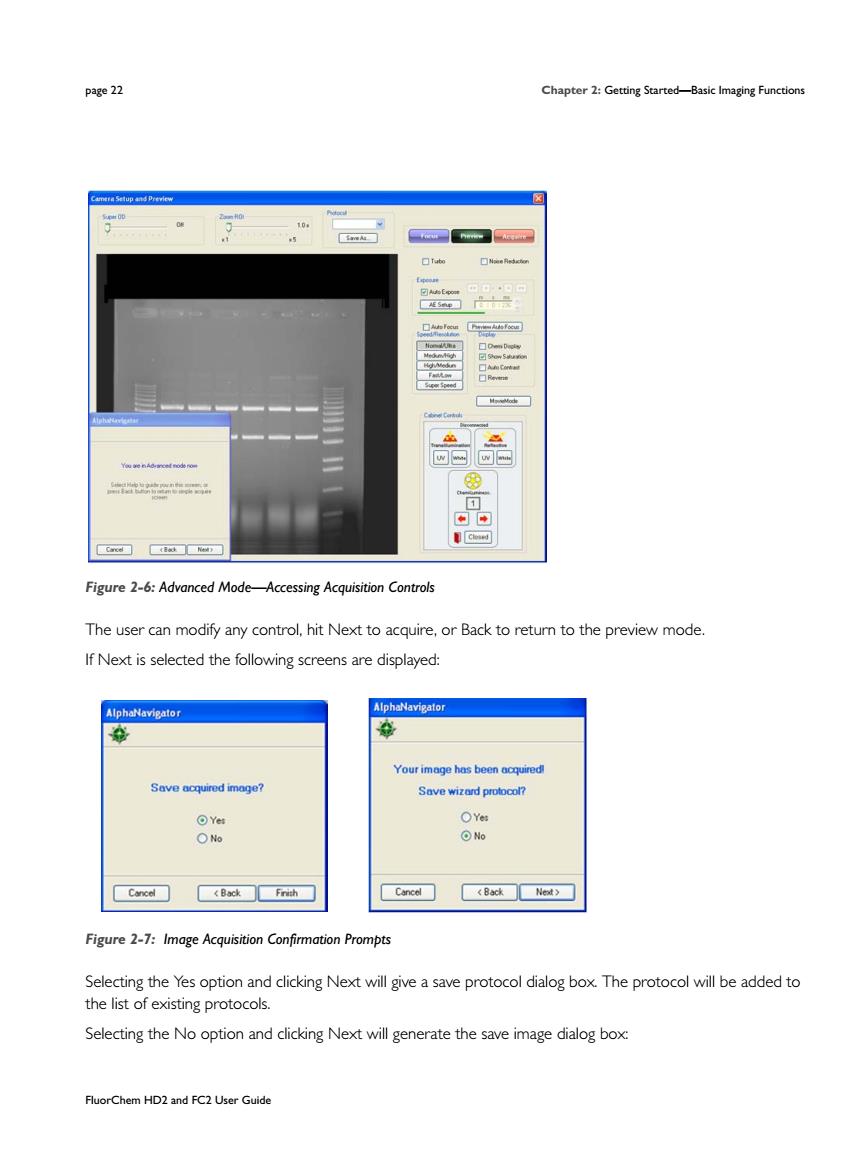
page 22 Chapter 2: Getting Started—Basic Imaging Functions FluorChem HD2 and FC2 User Guide Figure 2-6: Advanced Mode—Accessing Acquisition Controls The user can modify any control, hit Next to acquire, or Back to return to the preview mode. If Next is selected the following screens are displayed: Figure 2-7: Image Acquisition Confirmation Prompts Selecting the Yes option and clicking Next will give a save protocol dialog box. The protocol will be added to the list of existing protocols. Selecting the No option and clicking Next will generate the save image dialog box:
Basic Imaging Functions Page3 Selecting the Yes option and the clicking the Finish button will generate the save image dialog box and exit the Navigator.Selecting the No option,will close the Navigator. The next time the Navigator is run.the user can run the saved protocol: New image cnpture? OYe1.I need a触a城ance with image acquiio Figure 2-8:Running the Saved Protocol Selecting the No option,the following screen is generated with the last saved protocol selected. My Ech Borome Cc□<8kNed)□ Figure 2-9:Selecting the Saved Protocol The user can browse for other saved protocols by clicking on the down arrow.A list of existing protocols will be displayed: FluorChem HD2 and FC2 User Guide
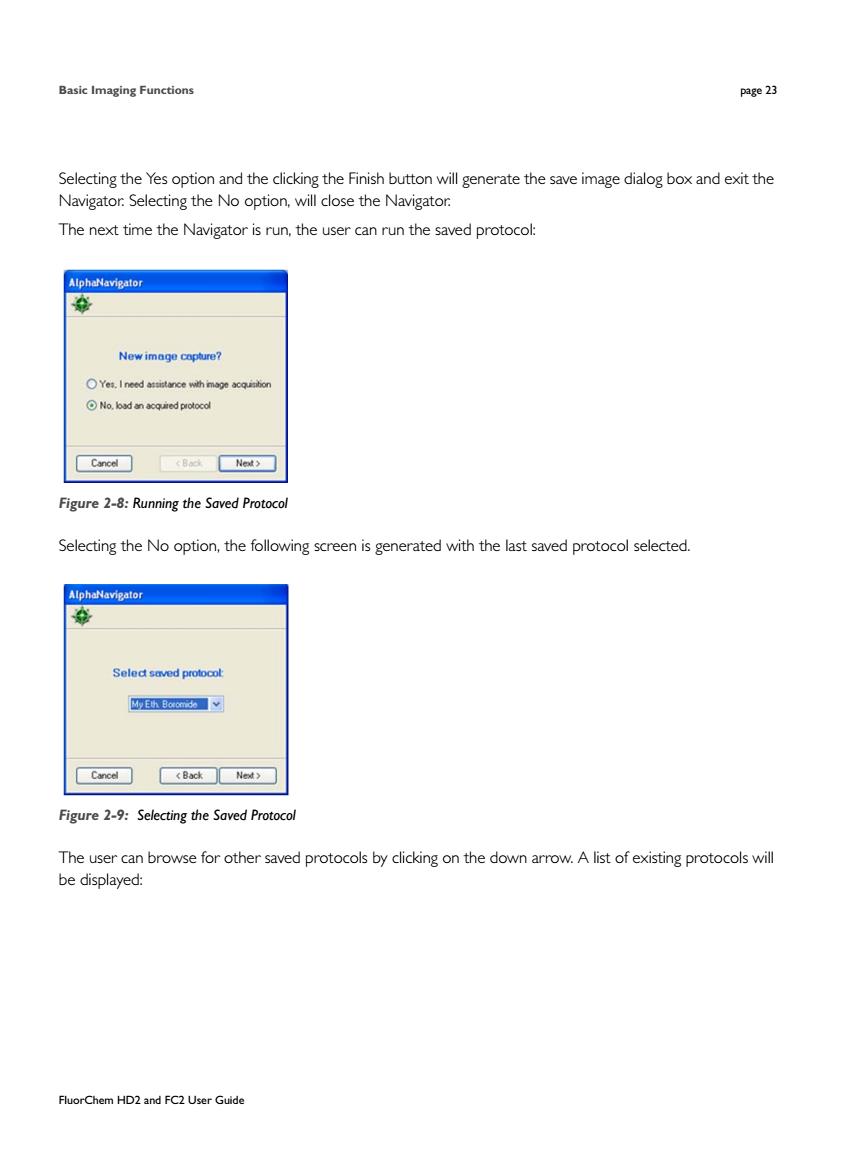
Basic Imaging Functions page 23 FluorChem HD2 and FC2 User Guide Selecting the Yes option and the clicking the Finish button will generate the save image dialog box and exit the Navigator. Selecting the No option, will close the Navigator. The next time the Navigator is run, the user can run the saved protocol: Figure 2-8: Running the Saved Protocol Selecting the No option, the following screen is generated with the last saved protocol selected. Figure 2-9: Selecting the Saved Protocol The user can browse for other saved protocols by clicking on the down arrow. A list of existing protocols will be displayed:
page 24 Figure 2-10:Selecting"My Eth.Boromide"Saved Protoc Selecting the saved protocol will go to the preview screen for the user to verify or acquire the setting. Acquiring an Image Using the Acquire Button Inthe Tool Bar,click the Camera Acquirec which launches the Camera Setup and Preview window:see Figure 2-I1. Figure 2-11:Camera Setup and Preview Window FluorChem HD2 and FC2 User Guide
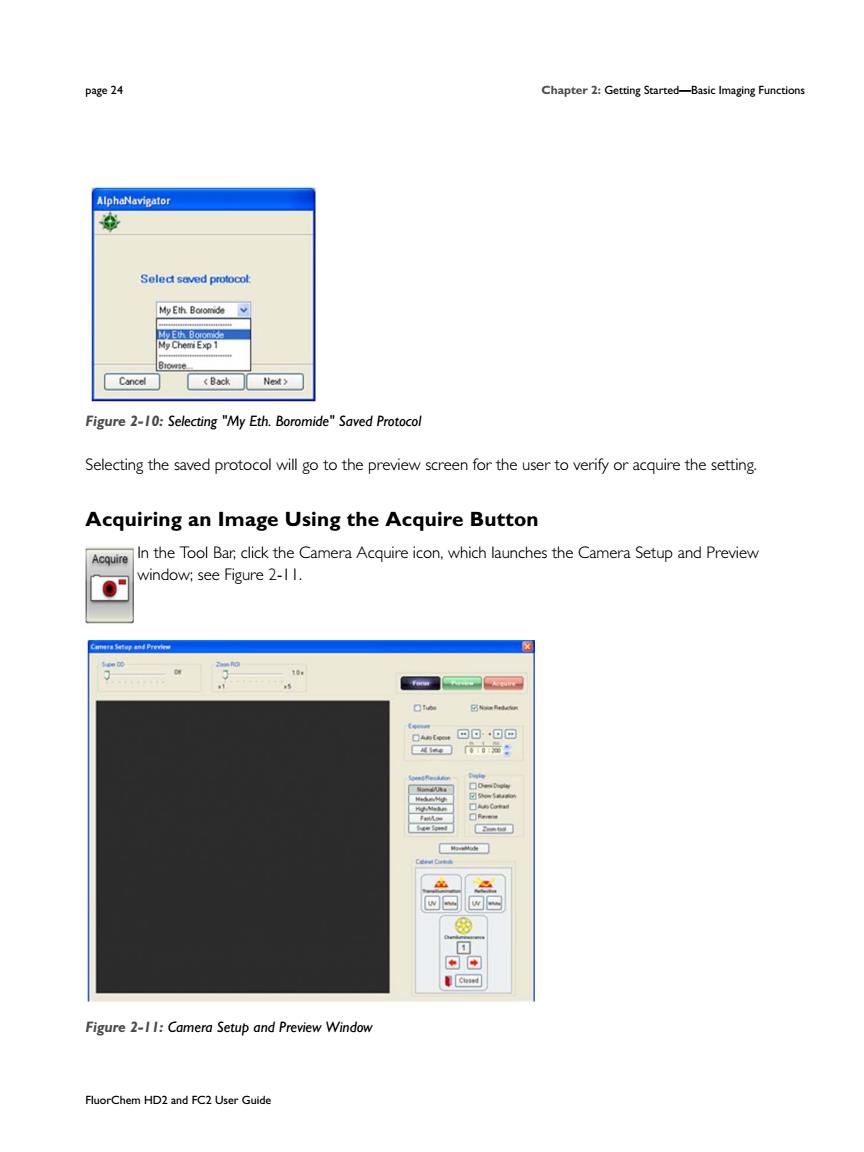
page 24 Chapter 2: Getting Started—Basic Imaging Functions FluorChem HD2 and FC2 User Guide Figure 2-10: Selecting "My Eth. Boromide" Saved Protocol Selecting the saved protocol will go to the preview screen for the user to verify or acquire the setting. Acquiring an Image Using the Acquire Button In the Tool Bar, click the Camera Acquire icon, which launches the Camera Setup and Preview window; see Figure 2-11. Figure 2-11: Camera Setup and Preview Window
Basic Imaging Functions page 25 This window provides camera exposure control,sensitivity/resolution control,lighting/filter wheel position ay optoneThtmagine chanre oufntabb for each channel that contains the complete acquisition configuration for that channel In addition,the system can enter Movie Mode by clicking the MovieMode button;see "Movie Mode,"starting on page 34. Focus Control Mode This window opens in Focus control mode (blue button).Focus control mode provides near-real time readout for easy sample positioning and optics adjustments.While in focus,select the lighting.filter,and binning options appropnate for your sample.You can then focus on your sample,select an aperture setting and focus on your image. NOTE:While in Focus control mode,we recommend dicking the Auto Expose check box to allow the software determine the optimal length of time for your image acquisition. Expose Preview allowing youto make small adjustmentsto the opions you Acquire Image Select Acquire Image to capture your final image.You will then be able to save,print or analyze your image. Auto Expose The AlphaView features an Auto Expose function for ease of use.The Camera Setup and Preview window includes a check box to activate the Auto Expose function,as well as a button labeled Auto Expose Setup to configure the function. FluorChem HD2 and FC2 User Guide
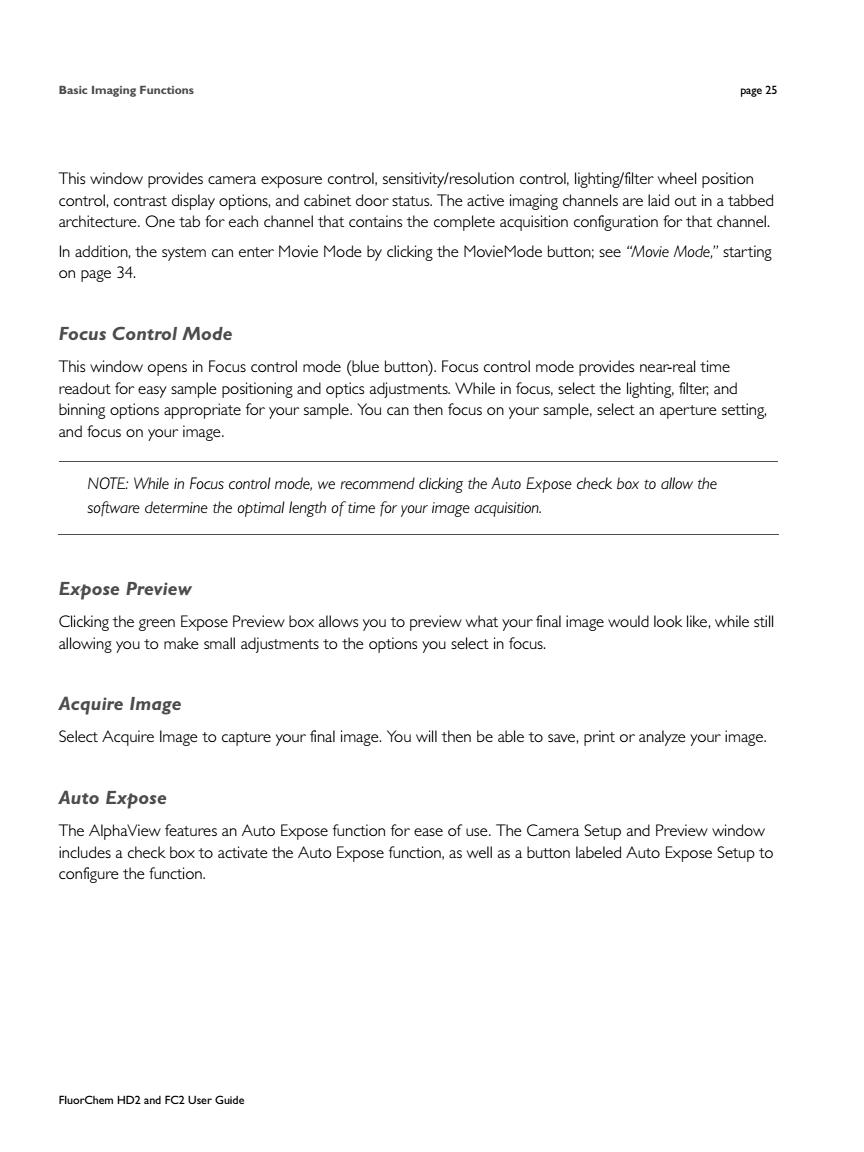
Basic Imaging Functions page 25 FluorChem HD2 and FC2 User Guide This window provides camera exposure control, sensitivity/resolution control, lighting/filter wheel position control, contrast display options, and cabinet door status. The active imaging channels are laid out in a tabbed architecture. One tab for each channel that contains the complete acquisition configuration for that channel. In addition, the system can enter Movie Mode by clicking the MovieMode button; see “Movie Mode,” starting on page 34. Focus Control Mode This window opens in Focus control mode (blue button). Focus control mode provides near-real time readout for easy sample positioning and optics adjustments. While in focus, select the lighting, filter, and binning options appropriate for your sample. You can then focus on your sample, select an aperture setting, and focus on your image. NOTE: While in Focus control mode, we recommend clicking the Auto Expose check box to allow the software determine the optimal length of time for your image acquisition. Expose Preview Clicking the green Expose Preview box allows you to preview what your final image would look like, while still allowing you to make small adjustments to the options you select in focus. Acquire Image Select Acquire Image to capture your final image. You will then be able to save, print or analyze your image. Auto Expose The AlphaView features an Auto Expose function for ease of use. The Camera Setup and Preview window includes a check box to activate the Auto Expose function, as well as a button labeled Auto Expose Setup to configure the function
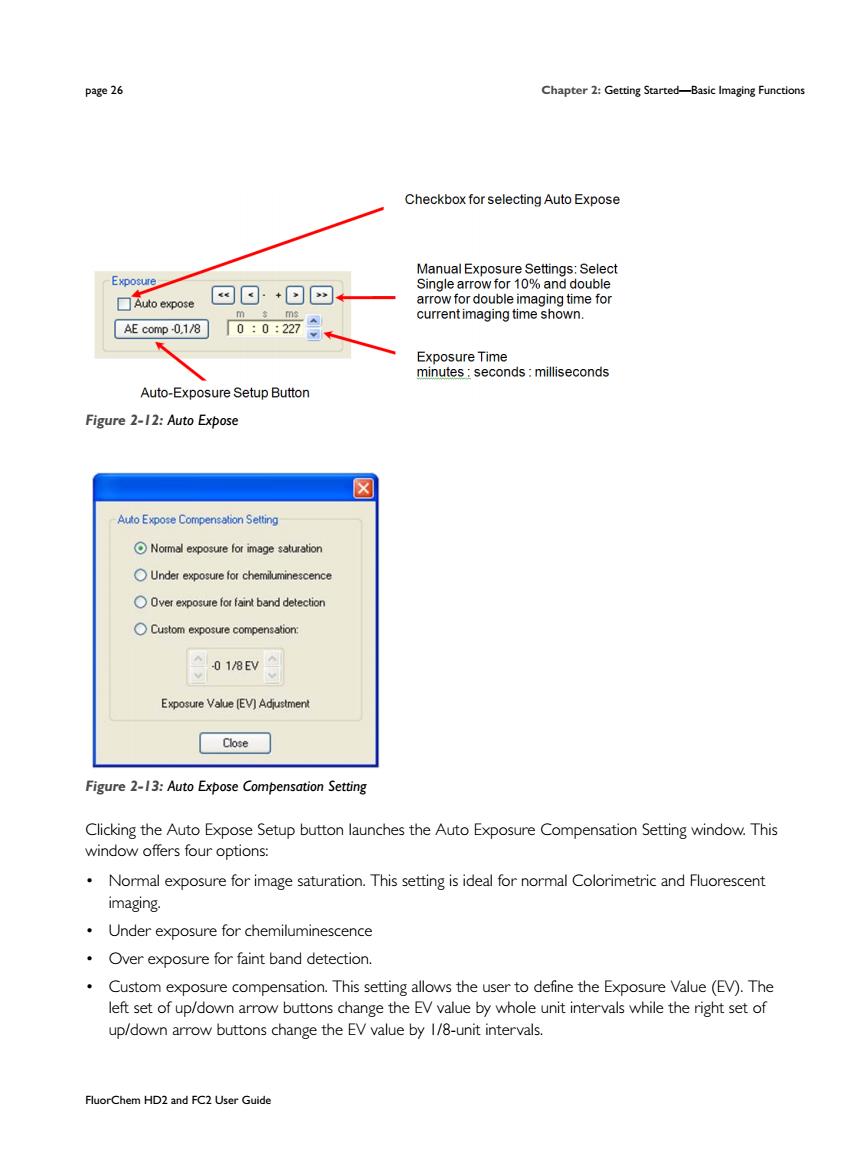
page 26 Checkbox for selecting Auto Expose ☐uto expose 网回+回网 AE comp0180:0:27等 ptenmiond Auto-Exposure Setup Button Figure 2-12:Auto Expose ☒ OUnder exposure for chemiluminescence 018v Expose Value (EV)Adutment aoe☐ Figure 2-13:Auto Expose Compensation Setting Clicking the Auto Expose Setup button launches the Auto Exposure Compensation Setting window.This window offers four options: Normal exposure for image saturation.This setting is ideal for normal Colorimetric and Fluorescent imaging Under exposure for chemiluminescence Over exposure for faint band detection. Custom exposure compensation.This setting allows the user to define the Exposure Value(EV).The left set of up/down arrow buttons change the EV value by whole unit intervals while the right set of up/down arrow buttons change the EV value by I/8-unit intervals. FluorChem HD2 and FC2User Guid
page 26 Chapter 2: Getting Started—Basic Imaging Functions FluorChem HD2 and FC2 User Guide Figure 2-12: Auto Expose Figure 2-13: Auto Expose Compensation Setting Clicking the Auto Expose Setup button launches the Auto Exposure Compensation Setting window. This window offers four options: • Normal exposure for image saturation. This setting is ideal for normal Colorimetric and Fluorescent imaging. • Under exposure for chemiluminescence • Over exposure for faint band detection. • Custom exposure compensation. This setting allows the user to define the Exposure Value (EV). The left set of up/down arrow buttons change the EV value by whole unit intervals while the right set of up/down arrow buttons change the EV value by 1/8-unit intervals