
Alternative 1.High throughput purification using MicroPlex Vacuum 业 Do not apply more than 600 Hl of sample at a time to a MicroSpin column.This procedure will accommodate lysates from 2 to 12 ml of culture. G 0er acwm). .Side arm flask.500 ml or 1 litre. .Single or double hole rubber stop Vacuum tubing MicroPlex 24 Vacuum apparatus (one or two). Assemble the MicroPlex 24 Vacuum following the instructions supplied end the Glutathione Sep in e MicroSpin e the columns in the 4 5. 6 Allow 10-15 seconds for the vacuum pressure to dissipate.Remove the manifold and place it on a paper towe Apply up to 600 ul of lysate to the column and incubate at room temperature for 5-10 minutes 8.Open the stopcock.After the lysates have been drawn through all the columns into the collection tray. aheamsnoieocncheehesopoackAebuehstendamnhoug Add 600 ul of 1X PE ld and the may be performe 1. Add 200 ul of Glu er to eacn co umn.inct ture for 5-10 minutes After elution buffer has been drawn through all the columns into the collection tray, 13.Aow10-15 ds for the va uum pressure to dissipate.Remove the maniold.Cover eluates with seaing tape until required for analysis obencreed yntelutsemesad ong Troubleshooting See Purification and Detection Troubleshooting page 28. Alternative 2.Purification of multiple samples using a microcentrifuge Dono apply more MicroSpn This procedure will accommodate lysates from 2 to 12 ml of culture
16 Alternative 1. High throughput purification using MicroPlex Vacuum Do not apply more than 600 µl of sample at a time to a MicroSpin column. This procedure will accommodate lysates from 2 to 12 ml of culture. Also required: • Vacuum source capable of providing 220 mm Hg (e.g. a water vacuum). • Side arm flask, 500 ml or 1 litre. • Single or double hole rubber stop. • Vacuum tubing. • MicroPlex 24 Vacuum apparatus (one or two). 1. Assemble the MicroPlex 24 Vacuum following the instructions supplied. 2. Resuspend the Glutathione Sepharose in each MicroSpin column by vortexing gently. 3. Remove the caps and snap off the bottom closures from the MicroSpin columns. Place the columns in the manifold, filling any unused holes with the plugs provided with MicroPlex 24 Vacuum. 4. Ensure the stopcock is in the closed position (i.e. perpendicular to the vacuum tubing) and that the manifold is placed squarely on the gasket. 5. Turn on vacuum supply at source. Open the stopcock (i.e. parallel to the vacuum tubing). After the column storage buffer has been drawn through all the columns into the collection tray, close the stopcock. 6. Allow 10–15 seconds for the vacuum pressure to dissipate. Remove the manifold and place it on a paper towel. 7. Apply up to 600 µl of lysate to the column and incubate at room temperature for 5–10 minutes. 8. Open the stopcock. After the lysates have been drawn through all the columns into the collection tray, close the stopcock. 9. Add 600 µl of 1X PBS wash buffer to each column. Open the stopcock. After buffer has been drawn through all the columns into the collection tray, close the stopcock. 10. Allow 10–15 seconds for the vacuum pressure to dissipate. Remove the manifold and reassemble the apparatus with a clean collection tray. Additional 600 µl washes may be performed if desired. 11. Add 200 µl of Glutathione elution buffer to each column. Incubate at room temperature for 5–10 minutes. 12. Open the stopcock. After elution buffer has been drawn through all the columns into the collection tray, close the stopcock. 13. Allow 10–15 seconds for the vacuum pressure to dissipate. Remove the manifold. Cover eluates with sealing tape until required for analysis. Note: Yields of fusion protein may be increased by repeating the elution step two or three times and pooling the eluates. Troubleshooting See Purification and Detection Troubleshooting page 28. Alternative 2. Purification of multiple samples using a microcentrifuge Do not apply more than 600 µl of sample at a time to a MicroSpin column. This procedure will accommodate lysates from 2 to 12 ml of culture

1.Resuspend the Glutathione Sepharose in each column by vortexing gently 2.Loosen the column caps one-fourth turn.Remove (and save)bottom closures 3.Place each column into a clean 1.5 or 2 ml microcentrifuge tube.Spin for 1 minute at 735 g 4.Discard the buffer from each centrifuge tube and replace the bottom closures. 5.Apply up to600ul of lysate to the column. 6.c relandmir ygle repeatedveoncbttoom temperro 8.Spin for 1minute at 735 g to collect flow through. 1.Aulo0-3200Hatcteheneiantgiertoeschcoaluman.Repteceopcapsandboomcosures t room te 13.Spin all columns again to collect eluate.Save for analysis. Note:Yields of fusion protein may be increased by repeating the eltion step times and pooling the Troubleshooting See Purification and Detection Troubleshooting page 28. Alternative 3.Purification using MicroPlex Centrifugation 业 Do not apply more than 600 ul of sample at a time to a GST MicroSpin column.This procedure will accommodate lysates from 2 to 12 ml of culture. See Appendix 4 for recommended centrifugation systems 1 Assemble the MicroPlex 24 unit following the instructions supplied.Two units can be processed simultaneously to handle 48 samples. Resuspend the Glutathione Sepharose in each column by vortexing gently. 3. Remove thcapsfrom the MicroSpin coums and snap off the boom cosures.Place the colunsinthe CaheteUior2mmtsolbmghehsnciosspiad Add up to 00 ul of lysate to each column.Incubate at roon nperature or5-10 minutes 8. Add 100-200 ul of glutathione elution buffer to each column.Incubate at room temperature for 5-10 minute 9. may be increased by repeating the elutio step twor three times and pooling the Troubleshooting See Purification and Detection Troubleshooting page 28. 17
17 1. Resuspend the Glutathione Sepharose in each column by vortexing gently. 2. Loosen the column caps one-fourth turn. Remove (and save) bottom closures. 3. Place each column into a clean 1.5 or 2 ml microcentrifuge tube. Spin for 1 minute at 735 g. 4. Discard the buffer from each centrifuge tube and replace the bottom closures. 5. Apply up to 600 µl of lysate to the column. 6. Recap each column securely and mix by gentle, repeated inversion. Incubate at room temperature for 5–10 minutes. 7. Remove (and save) the top caps and bottom closures. Place each column into a clean, pre-labelled 1.5 or 2 ml microcentrifuge tube. 8. Spin for 1 minute at 735 g to collect flow through. 9. Place each column into a clean, pre-labelled 1.5 or 2 ml microcentrifuge tube. 10. Apply 600 µl of 1X PBS wash buffer to each column and repeat spin procedure. Additional 600 µl washes with 1X PBS may be performed if desired. 11. Add 100–200 µl of Glutathione elution buffer to each column. Replace top caps and bottom closures. Incubate at room temperature for 5–10 minutes. 12. Remove and discard top caps and bottom closures and place the column into a clean 1.5 or 2 ml microcentrifuge tube. 13. Spin all columns again to collect eluate. Save for analysis. Note: Yields of fusion protein may be increased by repeating the elution step two or three times and pooling the eluates. Troubleshooting See Purification and Detection Troubleshooting page 28. Alternative 3. Purification using MicroPlex Centrifugation Do not apply more than 600 µl of sample at a time to a GST MicroSpin column. This procedure will accommodate lysates from 2 to 12 ml of culture. See Appendix 4 for recommended centrifugation systems. 1. Assemble the MicroPlex 24 unit following the instructions supplied. Two units can be processed simultaneously to handle 48 samples. 2. Resuspend the Glutathione Sepharose in each column by vortexing gently. 3. Remove the caps from the MicroSpin columns and snap off the bottom closures. Place the columns in the manifold. 4. Centrifuge the unit for 2 minutes following the instructions supplied. 5. Add up to 600 µl of lysate to each column. Incubate at room temperature for 5–10 minutes. 6. Centrifuge the unit for 2 minutes following the instructions supplied. If desired remove the manifold from each collection try and place on a clean paper towel. Reassemble each unit with a fresh collection tray. 7. Apply 600 µl of 1X PBS wash buffer to each column and repeat spin procedure. Additional 600 µl washes with 1X PBS may be performed if desired. Remove the manifold from each collection tray and place it on clean paper. 8. Add 100–200 µl of glutathione elution buffer to each column. Incubate at room temperature for 5–10 minutes. 9. Centrifuge the unit for 2 minutes following the instructions supplied. Cover the eluted samples with sealing tape until required for analysis. Note: Yields of fusion protein may be increased by repeating the elution step two or three times and pooling the eluates. Troubleshooting See Purification and Detection Troubleshooting page 28

Purification using GSTrap FF 1 ml or 5 ml columns GSTrap FF col ows a sc ematic of the simple or successful purification using a 1 ml GSTrap FF column. binding buffer 5-15 min Waste Collect fractions Fig.2.Simple purification of GST fusion proteins using GSTrap FF 业 Re-use of any purification column depends on the nature of the sample and should only be performed with identical fusion proteins to prevent cross-contamination. tion Larger o ease binding capacity Fast Flow(see Appendix 6 for column packing) Sample and buffer preparation Use high quality water and chemicals.Filtration through 0.45 pm filters is recommended Samples should be centrifuged immediately before use and/or filtered through a 0.45 pm filter.If the sample is too viscous,dilute with binding buffer. ved by adjusting the sample to the compositiono ute in binding buffer or perform a buffer exchange using a desalting column(see Chapter 7)
18 Equilibrate column with binding buffer Apply sample wash with binding buffer Waste Collect Elute with elution buffer Collect fractions 3 min 5-15 min 2 min Fig. 2. Simple purification of GST fusion proteins using GSTrap FF. Re-use of any purification column depends on the nature of the sample and should only be performed with identical fusion proteins to prevent cross-contamination. GSTrap FF columns (1 ml or 5 ml) can be connected in series to increase binding capacity and hence scale of purification. Larger columns can be packed with Glutathione Sepharose 4 Fast Flow (see Appendix 6 for column packing). Sample and buffer preparation Use high quality water and chemicals. Filtration through 0.45 µm filters is recommended. Samples should be centrifuged immediately before use and/or filtered through a 0.45 µm filter. If the sample is too viscous, dilute with binding buffer. Sample binding properties can be improved by adjusting the sample to the composition of the binding buffer: dilute in binding buffer or perform a buffer exchange using a desalting column (see Chapter 7). Purification using GSTrap FF 1 ml or 5 ml columns GSTrap FF columns can be operated with a syringe, a peristaltic pump or a liquid chromatography system such as ÄKTAprime. Figure 2 shows a schematic of the simple steps needed for successful purification using a 1 ml GSTrap FF column
Alternative 1.Manual purification with a syringe Binding buffer:1X PBS,pH73(140 mM NaCI,.7 mM KCI,10mM KH,POpH 7.3) Elution buffer:50 mM Tris-HCI,10 mM reduced glutathione,pH 8.0. 1.Fill the syringe with binding butfer column to the syringe using theadapter supplied (rop to dropto avoid introducing air in the column). 3 Remove the twist-off end. 4.Equilibrate the column with 5 column yolumes of bindine buffer. 6. of elution buffer.Maintain flow rates of 1-2ml/min(1ml column)and For large sample volumes a simple peristaltic pump can be used to apply sample and buffers. Alternative 2.Simple purification with AKTAprime ATAprime o purification of GST fusion proteins an,as shown followed exactly or optim aiRgasandrdpuntatoa Elutio 00 501
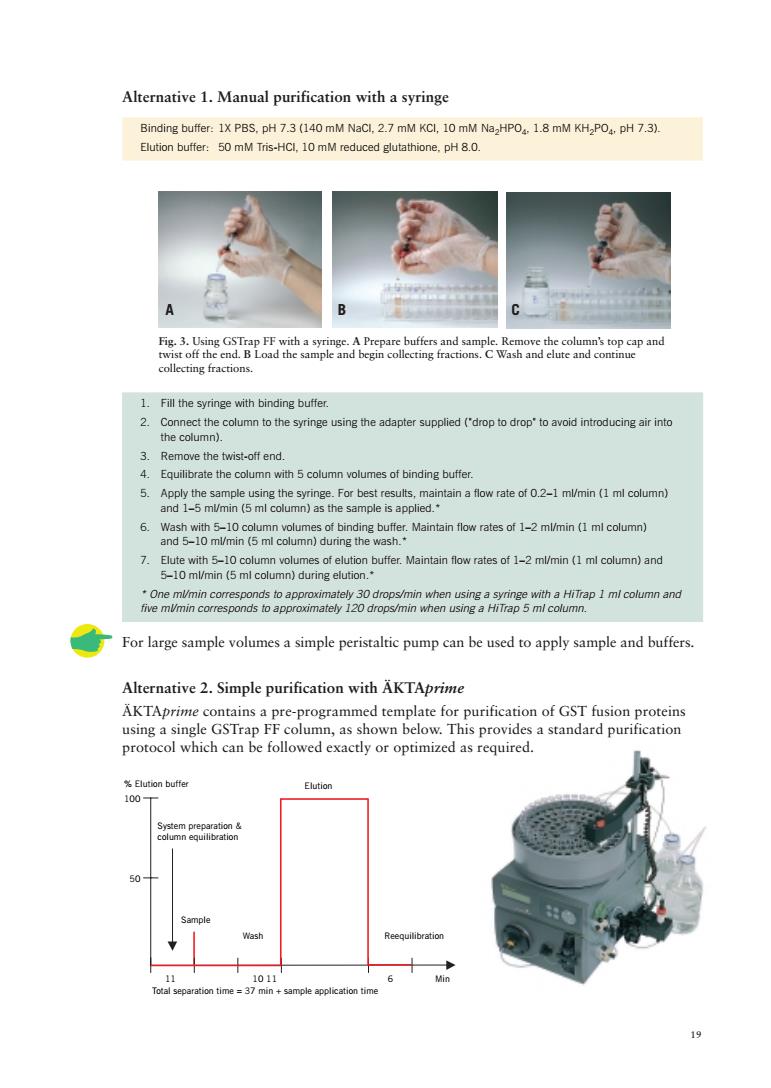
19 Alternative 1. Manual purification with a syringe Fig. 3. Using GSTrap FF with a syringe. A Prepare buffers and sample. Remove the column’s top cap and twist off the end. B Load the sample and begin collecting fractions. C Wash and elute and continue collecting fractions. ABC 1. Fill the syringe with binding buffer. 2. Connect the column to the syringe using the adapter supplied ("drop to drop" to avoid introducing air into the column). 3. Remove the twist-off end. 4. Equilibrate the column with 5 column volumes of binding buffer. 5. Apply the sample using the syringe. For best results, maintain a flow rate of 0.2–1 ml/min (1 ml column) and 1–5 ml/min (5 ml column) as the sample is applied.* 6. Wash with 5–10 column volumes of binding buffer. Maintain flow rates of 1–2 ml/min (1 ml column) and 5–10 ml/min (5 ml column) during the wash.* 7. Elute with 5–10 column volumes of elution buffer. Maintain flow rates of 1–2 ml/min (1 ml column) and 5–10 ml/min (5 ml column) during elution.* * One ml/min corresponds to approximately 30 drops/min when using a syringe with a HiTrap 1 ml column and five ml/min corresponds to approximately 120 drops/min when using a HiTrap 5 ml column. For large sample volumes a simple peristaltic pump can be used to apply sample and buffers. Alternative 2. Simple purification with ÄKTAprime ÄKTAprime contains a pre-programmed template for purification of GST fusion proteins using a single GSTrap FF column, as shown below. This provides a standard purification protocol which can be followed exactly or optimized as required. Binding buffer: 1X PBS, pH 7.3 (140 mM NaCl, 2.7 mM KCl, 10 mM Na2HPO4, 1.8 mM KH2PO4, pH 7.3). Elution buffer: 50 mM Tris-HCl, 10 mM reduced glutathione, pH 8.0. Wash Reequilibration Elution System preparation & column equilibration 100 50 11 10 11 6 Min Sample Total separation time = 37 min + sample application time % Elution buffer

Bindin buffer:0mM sodium phosphate,0.15 M NaCl,pH 7.3(the buffer used in Altemative 1) Follow instructions supplied on the AKTAprimecue card (Code No.1-1138-0 Select the Application Template Start the metho Enter the sample volume and press OK to start. Connecting the column Preparing the fraction co Fig.4.Typical procedures when using AKTAprime. Figure 5 shows a typical purification of GST fusion protein on GSTrap FF 1 ml,using a chromatography system,and an SDS-PAGE analysis of the purified protein. GSTrap FF 1 ml B5.pH7.3 Lane 2 50 100 300 10 40 20 123 59888 Fig.5a.Purification of GST fusion protein on GSTrap FF 1 ml. Troubleshooting See Purification and Detection Troubleshooting page 28
20 Connecting the column. Preparing the fraction collector. Fig. 5a. Purification of GST fusion protein on GSTrap FF 1 ml. Fig. 5b. SDS-PAGE on ExcelGel™ SDS Gradient 8–18% using Multiphor™ II (Amersham Pharmacia Biotech) followed by silver staining. Binding buffer: 20 mM sodium phosphate, 0.15 M NaCl, pH 7.3 (or the buffer used in Alternative 1). Elution buffer: 50 mM Tris-HCl, 10 mM reduced glutathione, pH 8.0. Prepare at least 500 ml of each eluent. 1. Follow instructions supplied on the ÄKTAprime cue card (Code No. 18-1138-06). 2. Select the Application Template. 3. Start the method. 4. Enter the sample volume and press OK to start. Column: GSTrap FF 1 ml Sample: 8 ml cytoplasmic extract from E. coli expressing a GST fusion protein Binding buffer: PBS, pH 7.3 Elution buffer: 50 mM Tris-HCl, pH 8.0 with 10 mM reduced glutathione Flow: 1 ml/min Chromatographic procedure: 4 CV binding buffer, 8 ml sample, 10 CV binding buffer, 5 CV elution buffer, 5 CV binding buffer (CV = column volume) System: ÄKTAexplorer Lane 1: Low Molecular Weight (LMW) Calibration kit, reduced, Amersham Pharmacia Biotech (10 µl prepared for silver stain) Lane 2: Cytoplasmic extract of E. coli expressing GST fusion protein, 1 g cell paste/10 ml (5 µl sample from collect. fraction + 35 µl sample cocktail -> 10 µl applied) Lane 3: GST fusion protein eluted from GSTrap FF 1 ml (5 µl sample from collect. fraction + 35 µl sample coctail -> 10 µl applied) Fig. 4. Typical procedures when using ÄKTAprime. Figure 5 shows a typical purification of GST fusion protein on GSTrap FF 1 ml, using a chromatography system, and an SDS-PAGE analysis of the purified protein. 0 20 40 60 80 100 % Elution buffer 0 0.5 1.0 1.5 2.0 2.5 3.0 3.5 5.0 10.0 15.0 20.0 ml min Wash Elution buffer 2.7 mg pure GST fusion protein 5.0 10.0 15.0 20.0 A280 1 2 3 Mr 97 000 66 000 20 100 30 000 45 000 14 400 Troubleshooting See Purification and Detection Troubleshooting page 28