
2.Drag diagonally downward over the existing 2.Double-click the atom to open a text box bond to create a double bond. 3.Type and then type"" Change the orientation of the double bond 1.Point to the center of the double bond. Label an atom with“oHy 2.Click the bond twice to move the second line to 1.Point to the atom shown below. the outside. The bond moves to the inside on the first click and to the outside on the second click. 2.Double-click the atom to open a text box NOTE:You can move a double bond by clicking it whena is selected.The cursor corresponding to the bond tool that is selected appears. 3.Type OH. Add an atom label: Next you will add an arrow that is not included in the arrow palette to indicate electron flow. 1.Point to the atom to label shown below. To create a customized arrow using the Pen tool 1.Click the Pen tool☒ 2.From the Curves menu,choose Arrow at End. 30 Chapter 2:Tutorials Tutorial 2:Drawing an Intermediate
30 • Chapter 2: Tutorials CambridgeSoft Tutorial 2: Drawing an Intermediate Administrator 2. Drag diagonally downward over the existing bond to create a double bond. Change the orientation of the double bond: 1. Point to the center of the double bond. 2. Click the bond twice to move the second line to the outside. The bond moves to the inside on the first click and to the outside on the second click. NOTE: You can move a double bond by clicking it when a bond tool is selected. The cursor corresponding to the bond tool that is selected appears. Add an atom label: 1. Point to the atom to label shown below. 2. Double-click the atom to open a text box. 3. Type O and then type “-”. Label an atom with “OH”: 1. Point to the atom shown below. 2. Double-click the atom to open a text box. 3. Type OH. Next you will add an arrow that is not included in the arrow palette to indicate electron flow. To create a customized arrow using the Pen tool. 1. Click the Pen tool . 2. From the Curves menu, choose Arrow at End. O- O- O-

3.Point near the double bond where you want to 6.Drag upward to create a curve segment. indicate the start of electron flow OH 4.Drag downward and to the left.Release the mouse button Refine the shape of the arrow 1.Point to the handle pointing away from and to OH the right of the curve.This is a tangent handle that controls the tangent of the curve that it touches. The hand with a“+”cursor indicates that you 2.Drag the handle upward to the right to make the are in the editing mode of the Pen tool. arrowhead point more inward. 5.Position the cursor where you want the arrowhead to appear 3.Press Esc when you are finished. ChemDraw 7 Chapter 2:Tutorials 31 Tutorial 2:Drawing an Intermediate
ChemDraw 7 Chapter 2: Tutorials • 31 Tutorial 2: Drawing an Intermediate 3. Point near the double bond where you want to indicate the start of electron flow. 4. Drag downward and to the left. Release the mouse button. The hand with a “+” cursor indicates that you are in the editing mode of the Pen tool. 5. Position the cursor where you want the arrowhead to appear. 6. Drag upward to create a curve segment. Refine the shape of the arrow: 1. Point to the handle pointing away from and to the right of the curve. This is a tangent handle that controls the tangent of the curve that it touches. 2. Drag the handle upward to the right to make the arrowhead point more inward. 3. Press Esc when you are finished. O- OH O- OH O- OH O- OH

4.Create additional arrows as described above to Create a ring complete the intermediate as shown below. 1.Click the Cyclohexane Ring tool 2.Point in an empty area ofa document windov 3.Click to add a ring NOTE:Ifyou want to magnify the entire document so you can see arrows or other objects that are in small places.choose Magnify from the View menu. Fuse a second ring to the first: Save and close the document 1.Point to the center of lower right bond in the 1.From the File menu,choose Save. ring. 2.From the File menu,choose Close Tutorial 3:Using Rings In this tutorial you will draw more complex structures by using rings. 2.Click to fuse another ring. Open a new ChemDraw document 1.From the File menu,choose New Document 2.From the File menu,choose Save As. 3.Type tut3.cdx in the appropriate text box 4.Select a folder in which to save the file. 5.Click Save 32 Chapter 2:Tutorials CambridgeSof Tutorial 3:Using Rings
32 • Chapter 2: Tutorials CambridgeSoft Tutorial 3: Using Rings Administrator 4. Create additional arrows as described above to complete the intermediate as shown below. NOTE: If you want to magnify the entire document so you can see arrows or other objects that are in small places, choose Magnify from the View menu. Save and close the document: 1. From the File menu, choose Save. 2. From the File menu, choose Close. Tutorial 3: Using Rings In this tutorial you will draw more complex structures by using rings. Open a new ChemDraw document: 1. From the File menu, choose New Document. 2. From the File menu, choose Save As. 3. Type tut3.cdx in the appropriate text box. 4. Select a folder in which to save the file. 5. Click Save. Create a ring: 1. Click the Cyclohexane Ring tool . 2. Point in an empty area of a document window. 3. Click to add a ring. Fuse a second ring to the first: 1. Point to the center of lower right bond in the ring. 2. Click to fuse another ring. O- OH CH O
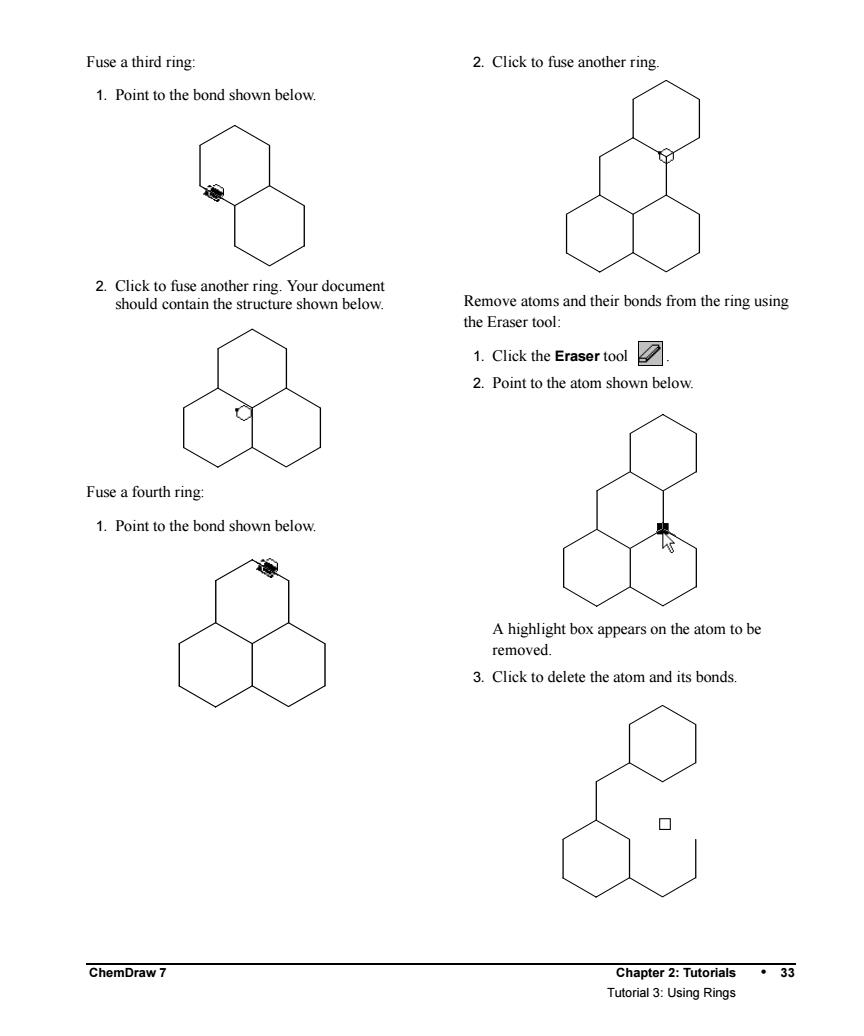
Fuse a third ring: 2.Click to fuse another ring. 1.Point to the bond shown below. Remove atoms and their bonds from the ring using the Eraser tool: 1.Click the Eraser tool 2.Point to the atom shown below Fuse a fourth ring: 1.Point to the bond shown below A highlight box appears on the atom to be removed 3.Click to delete the atom and its bonds ChemDraw 7 Chapter 2:Tutorials.33 Tutorial 3:Using Rings
ChemDraw 7 Chapter 2: Tutorials • 33 Tutorial 3: Using Rings Fuse a third ring: 1. Point to the bond shown below. 2. Click to fuse another ring. Your document should contain the structure shown below. Fuse a fourth ring: 1. Point to the bond shown below. 2. Click to fuse another ring. Remove atoms and their bonds from the ring using the Eraser tool: 1. Click the Eraser tool . 2. Point to the atom shown below. A highlight box appears on the atom to be removed. 3. Click to delete the atom and its bonds

4.Click each of the atoms shown below to delete 3.Drag upward to draw a double bond the bonds Add another double bond 1.Point to the atom shown belov The resulting structure is shown below. 2.Right-click,point to Double,and then choose Plain. Realign the double bond so it is centered: Add double bonds to the structure: 1.Point to the center of the upper double bond. 1.Click the Solid Bond tool 2.Point to the atom indicated below 2.Right-click,point to Bond position,and then choose Centered 34· Chapter 2:Tutorials CambridgeSof Tutorial 3:Using Rings
34 • Chapter 2: Tutorials CambridgeSoft Tutorial 3: Using Rings Administrator 4. Click each of the atoms shown below to delete the bonds. The resulting structure is shown below. Add double bonds to the structure: 1. Click the Solid Bond tool . 2. Point to the atom indicated below. 3. Drag upward to draw a double bond. Add another double bond: 1. Point to the atom shown below. 2. Right-click, point to Double, and then choose Plain. Realign the double bond so it is centered: 1. Point to the center of the upper double bond. 2. Right-click, point to Bond position, and then choose Centered